In my last post I mentioned that it is becoming more common for units to get people started with buttonholing by inserting a plug into each needle hole for a couple of weeks, so that buttonhole and tunnel formation are accelerated. I met with Anna Flynn, a very experienced practitioner of this technique last week to get the whole story.
As you know, I am a big proponent of buttonholing (using the same needle holes for each dialysis session) for several reasons. On a day-to-day basis, you get less pain when the needles go in, less lumps and bumps develop on your arm and bleeding times is reduced to a few minutes once the needles have been removed. In the longer term, it is pretty clear that fistulas last and stay functional for a longer time.
Just a quick recap on what buttonholing is:
- Using the same hole, inserting at the same angle and depth eventually creates a tunnel down to the fistula vessel for each needle.
- At the start of the next session, each site is cleaned and sanitised, the scab that forms after the last session is lifted off, the sites are cleaned again and the needles inserted to puncture the fistula at the same place each time
- After a few weeks of this, a tunnel forms to guide each needle and a flap or “trap door” is created in the fistula wall
- At this point, you can switch to blunt needles, since there is no longer much resistance when the needle is inserted: it flows down the tunnel, opens the flap, and Robert’s your father’s brother!
- When you remove the needle, the flap closes over and the after a few minutes pressure, the bleeding stops, you put on a light dressing and go home.
That’s buttonholing.
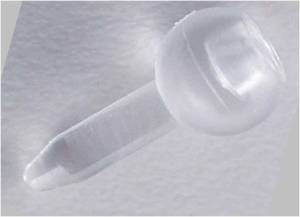
Now, about the plugs. Called Bioholes® (manufactured only by Nipro in Japan) they are very small, sterile, polycarbonate, thumbtack-shaped pegs, used to prop the needle tracks open between cannulations.
Once inserted, scar tissue forms quickly around the peg as the body tries to heal itself in just the same that a newly pierced ear does, when a sleeper stud is left in place to preserve the new hole. This scar tissue helps form the tunnel track and can be felt as a small lump over the needle site as the track develops. Typically you need only 6 or 7 sessions to create fully developed buttonhole.
Bioholes® were developed in Japan in 2003 (yes, things move slowly in medical world), to speed the buttonhole development cycle and the enable the buttonholing to be introduced to dialysis units on a large scale. The problem with the buttonhole approach is that it requires that the same person to insert the needle each time. This is not possible in most dialysis units with many staff on various rosters. Using these plugs and a customised protocol, these problems can be minimised. Bioholes® are being trialled in Europe (see this paper); they used Asia and the pacific (including Australia) now, and are probably coming to a BigD unit near you sooner rather than later.
Here’s how it’s done:
1. At the end of dialysis, remove the needles as usual, and apply pressure to stop bleeding the needle sites.
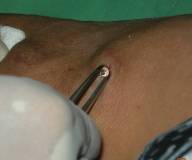
2. Once bleeding has stopped, ideally wait for five minutes, then insert the Biohole pegs can be inserted into the holes, using an aseptic technique.
3. Cover the pegs with at least two plasters to avoid the accidental dislodgement. Keep them in place until the next dialysis session.
4. At the next dialysis session, the nurse and or the patient removes the pegs.
5. After the patient has washed their hands and fistula arm with antibacterial soap and water, sharp needles are inserted as normal into the sites recently vacated by the Biohole peg.
While we are on buttonholing, there are a couple tricks to know:
- Getting the scab off before inserting the blunt needle: I use a sharp needle, so I can get under the scab and lift it off. Most use blunt Drawing-Up needles. Both are effective; the sharp are quicker, but you can do a bit of damage if you are not careful (especially if like me, your eyesight is a bit iffy).
- If you are having trouble getting the scab off, put some saline or skin disinfectant on some gauze for 5 minutes, to soften it up.
- Recent finding indicate the buttonholing can increase the potential for infection, so swab before and after removing the scab and if you need to fully withdraw the needle while you are hunting for the flap, start again with a new needle.
- Sometimes, with the best technique, the needle can’t find the entry flap (my fistula seems to be always on the move, and the entry point seems to wander). Don’t force it: you can tear and scrape tissue which is both painful and ineffective.
- Insert the blunt needle by holding the tubing part of the needle just behind the wings and with a gentle twisting and rotating motion, allow it to seek out the tunnel. It can be helped along by gently stretching the skin to open the tunnel.
For more details, check out Anna’s presentation:
Many thanks to Anna Flynn for the pics and the extensive advice.

 Professional dialysis recruitment


